Creating a Static Site in GitHub Pages S26
Guidelines for the Lab:
Today in lab one of the things we will be doing is to create your own site at GitHub Pages in which you post all of your coursework, including writing and visuals. Creating such a site will require us to set up GitHub, GitHub Desktop and a text editor (VSCode in S26), to learn and practice some Markdown and to get comfortable with editing on our own machine and then publishing our materials gently to the web.
Knowing how to create such a “static site” is an important skill in minimal and sustainable digital arts and humanities. The site is free, maintenance is minimal and it can also sit alongside examples of code or data that you have created. Curating a tidy, clear site creates a web presence for yourself.
This course site is created in GitHub Pages by forking the Minimal Mistakes starter theme. I have used this theme to model how you can go about learning for yourself. When you gain more confidence you will be able to change to other themes (or even go with the full version of the Minimal Mistakes theme) and customize them to your own liking.
GitHub and GitHub Pages Terminology
Before we begin, here are some new terms you’ll encounter when working with GitHub:
| Term | Definition |
|---|---|
| Repository (Repo) | A folder/project containing all your files and their revision history. Can exist locally on your computer and/or remotely on GitHub. |
| Fork | Creating a copy of someone else’s repository in your own GitHub account. You can modify your fork without affecting the original. |
| Clone | Downloading a copy of a repository from GitHub to your local computer so you can work on it offline. |
| Commit | Saving a snapshot of your changes with a descriptive message. Think of it as a checkpoint in your project’s history. |
| Push | Uploading your local commits to the remote repository on GitHub, making your changes visible online. |
| Fetch | Downloading changes from the remote repository to your local copy to stay up-to-date. |
| Versioning | The practice of tracking and managing changes to files over time. Git stores a complete history of every version of your project, allowing you to revert to previous versions if needed. |
| Static Site | A website composed of fixed HTML, CSS, and JavaScript files that don’t change unless you edit them directly. Static sites are fast, secure, and require no database or server-side processing. |
| GitHub Pages | A free hosting service provided by GitHub that automatically publishes websites directly from a repository. Perfect for static sites, portfolios, and documentation. |
| Template | A pre-designed structure and styling for a website that you can customize with your own content. Templates like Minimal Mistakes provide a foundation so you don’t start from scratch. |
| Jekyll | A static site generator that transforms your Markdown and template files into HTML. GitHub Pages uses Jekyll to automatically build your site. |
| Markdown | A simple, human-readable format for writing content that gets converted to HTML. Uses symbols like # for headings, ** for bold, and - for lists. |
| Build | The process where Jekyll converts your Markdown files and templates into the final HTML website that visitors see. GitHub Pages builds automatically when you push changes. |
STEP 1: Getting the basics set up
- You need to have a Github account. We will create a repository in it in which we install a template for the site. If you already have a Github account and would like to use it and there is a repository {yourusername}.github.io set up already, you have a few options:
- you can delete the repository if you do not want it anymore
- you can rename the repository, e.g. if the repo were named daahnyuad.github.io you could rename it daahnyuad1.github.io and proceed with this tutorial.
- you can create an empty repository named, for example
daah, and then install the template inside of it. - you can create a new Github account for the purposes of this course.
These instructions will guide you through the third option.
-
Make sure you have downloaded a text editor of your choice for your system. This lab write up will explain how to use Visual Studio Code. Others are possible, such as Sublime Text or RStudio Desktop, but they are not explained here.
-
Make sure you have downloaded Github Desktop for your system. If you are familiar with versioning systems, you do not have to use Github Desktop and its graphic user interface, but this tutorial assumes that you do. Some folks like to use Visual Studio Code because they can push their code directly to GitHub as explained here, but we have kept the intermediate step to foreground the versioning process. Feel free to work in the way that is most intuitive and efficient for you. I suggest starting with Github Desktop and transitioning to committing directly in VSCode.
STEP 2 “Forking” a repo.
Detailed general instructions for forking can be found here
-
Once you have completed 1 and 2, you can proceed with making a duplicate of the template we will be using. We do this by navigating to the main page of an existing GitHub page of
minimal-mistakesand will be using their starter template: https://github.com/mmistakes/mm-github-pages-starter -
With your GitHub account open (you can tell it is open when you see the icon of your account at top right), navigate to this link above, look above the file list to the right, and click
Use This Template(If you do not see it, you may have to go to Settings to click it on). Selectcreate a new repository. This will take what is atminimal-mistakesand transfer it over into your account (this is called “forking”). -
On the page
create a new repositoryyou need to give the repository a name. You should see under general your username. Next to it you can choose a repository name (for example, DAAH). Give it a description Make sure you set the repository to public and then click on the green buttoncreate repository -
Once the repository has been created you need to activate the “build and deploy” function for that page. Go to Settings > Pages and select the
masterbranch and save. You can tell that something is working in the repository you just create when you go back and you see the brown dot. A green check mark means the process is done.
Note that the repo we have forked is a simplified version of
minimal-mistakes. If you want to tap into all the options of the full version, you will have to download the full theme and do more work!
We will use the starter website (and customize it) for our work in IM-UH 1511, including the creation of pages and posts.
STEP 3 Connecting the cloud-based Github to your own machine.
- “Cloning” this repository to Github Desktop
Open GitHub Desktop and log into it with your credentials from your GitHub account. You can check that at Setting > Accounts.
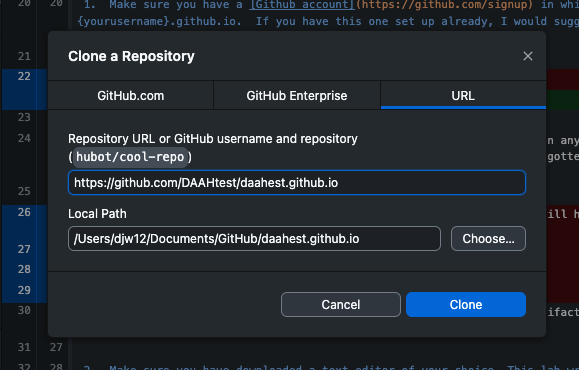
In Github Desktop, go to File > Clone Repository or with the abovementioned repository, click on the add button and pull down for clone repository.
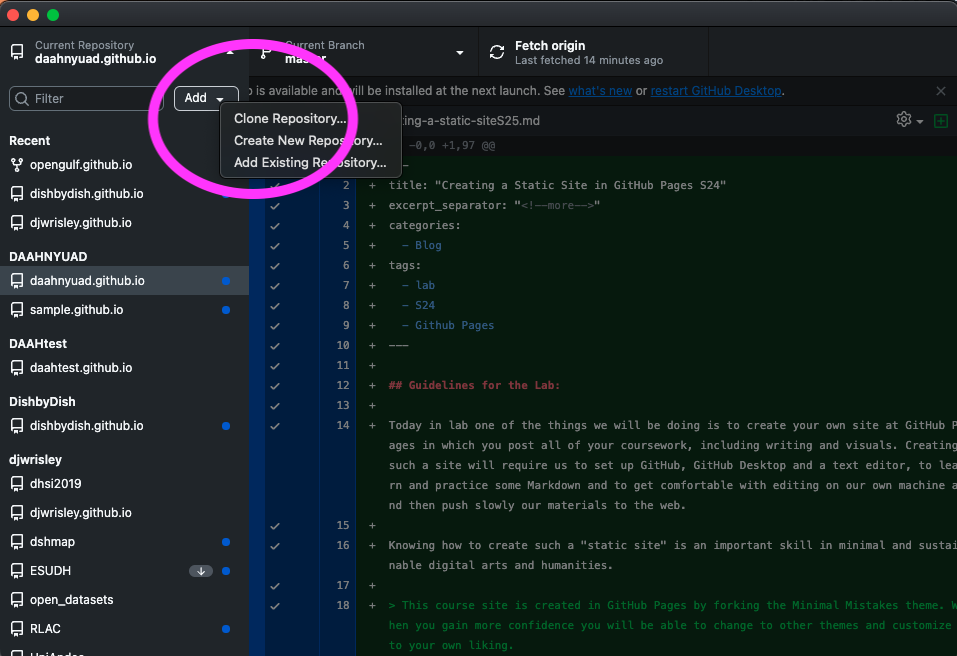
There are several ways of finding the repository you want to clone. When you install Github Desktop for the first time it may ask you if you want to clone. It may also suggest that repo once you have selected clone repository. Another sure way of selecting the right place is to copy the URL of your repository where you forked the minimal-mistakestemplate. You can paste that URL in the URL tab and click clone.
If successful, you should be able to see the repository in the current repository tab at top left in Github Desktop.
- Editing the repository on your own machine.
Now that you have a copy of the repository on your laptop you can edit it there (even offline and with no internet connection) and then later “push” the changes to the web.
When you edit, save in VSCode (and sometime enter a commit message in Github Desktop), you then clock commit to master and you will see a blue button at right push origin. Click it to transfer these changes to the web. That is three clicks to push something to the web!
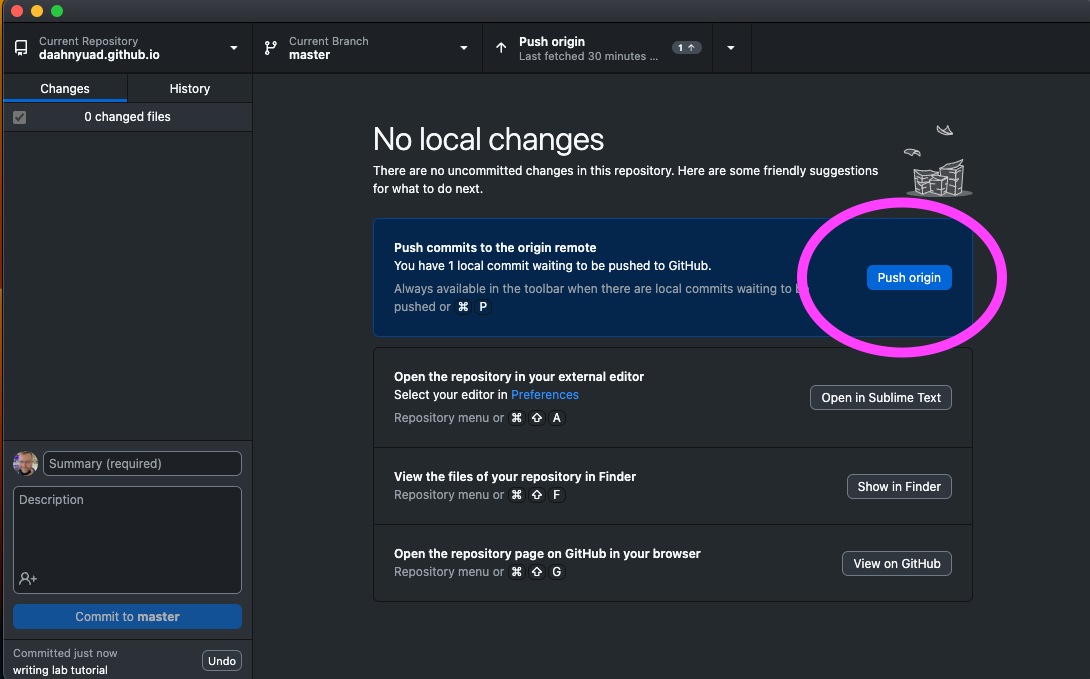
Remember that every time you push to the web, the compiler works to make your page’s updates. Be patient and look for the green arrow which indicates that your site has been rebuilt with the changes you made. If you see a brown dot next to the last commit message in the repository holding the site, the compiler has not finished. Go have some tea or a quick walk–it will be done soon.
NB: You can do some editing in the GitHub web interface itself, but I recommend editing in Github Desktop with your text editor, and certainly not mixing the web-based interface and the text editor, since you end up with a versioning nightmare. If you do make a change in the GitHub web interface, make sure that you fetch the origin.
- If you use the button in Github Desktop to open in external editor (choosing Visual Studio Code), we can now move on to editing any of the pages.
Let’s make some changes in VSCode and push them.
Pages that have editable material to change your site:
- navigation.yml
- _config.yml
So that you can have the landing page be a page and not a post, try this:
Follow up posts:
- Connecting your VSCode to CoPilot and Customizing your GitHub page
- Committing directly in VSCode – coming soon
Enjoy!